Add Quick Launch to Taskbar
NOTE: If you make any changes to your theme, you will need to save the theme afterwards, or you will lose Quick Launch the next time you restart the computer.
10. If you have a 32-bit Windows 7, then it has been reported that you may need to turn off UAC if Quick Launch is disappearing on you after every restart.
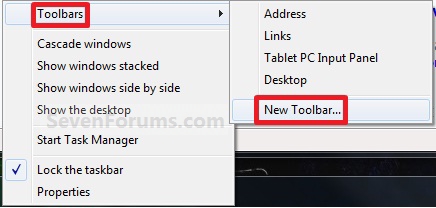
1. Right click on a empty space on the taskbar, then select (hover on) Taskbar and click on New Toolbar. (See screenshot below)
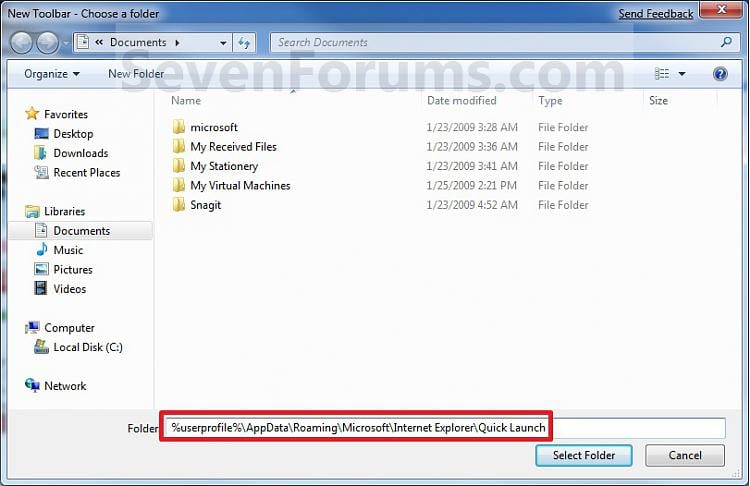
2. In the Folder line, type or copy the location below. (See screenshot below)
Code:%userprofile%\AppData\Roaming\Microsoft\Internet Explorer\Quick Launch3. Click on the Select Folder button. (See screenshot above)
4. You now have a Quick Launch toolbar on the taskbar. (See screenshot below)
NOTE: Click on the arrow to see your Quick Launch shortcuts.
5. To Expand the Quick Launch Toolbar
A) Unlock the taskbar.6. To Remove Quick Launch Toolbar Icon Text or Title
B) Left click on the dotted lines and hold, then drag it to the left or right to adjust to unhide all of the icons. Release the left click when done. (See screenshot below)
C) Lock the taskbar.
A) Unlock the taskbar.7. To Have Small or Large Icons for Quick Launch Toolbar
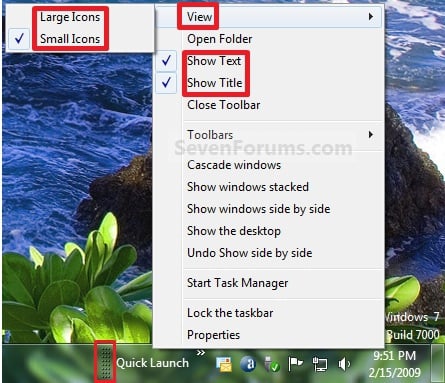
B) Right click on the Quick Launch toolbar title name, then uncheck the Show Text and Show Title by clicking on them. (See screenshot below step 5B)
C) Lock the taskbar.
A) Unlock the taskbar.
B) Right click on the Quick Launch toolbar title name, then click on View and select to have Large Icons or Small Icons. (See screenshot below step 5B)
C) Lock the taskbar.
8. To Have Quick Launch Toolbar on Left Side of Taskbar9. Now that you have Quick Launch on the taskbar, you will need to save your current theme (step 4 at this link).
A) Unlock the taskbar.
B) Left click on the dotted lines of the pinned taskbar programs of the left side and hold, then drag it to the right past the Quick Launch toolbar and release. (See screenshot below)
C) The Quick Launch toolbar is now on the left side of the taskbar. (See screenshot below)
D) Left click on the dotted lines of these and hold and drag them to make any adjustments to how you want them place on the taskbar. (See screenshot above)
E) Lock the taskbar.
NOTE: If you make any changes to your theme, you will need to save the theme afterwards, or you will lose Quick Launch the next time you restart the computer.
10. If you have a 32-bit Windows 7, then it has been reported that you may need to turn off UAC if Quick Launch is disappearing on you after every restart.


No comments:
Post a Comment